
Here at hype, we always want to offer the best work that we can for our clients, and we’re always looking for ways to improve the services we offer and find ways to grow as a team. With challenges of reflective surfaces and the mega-green hype wall getting in the way, as well as wanting some creative input, Emma approached local photographer, Jacqui, for her help and advice on improving our photography skills. Kindly, she accepted the invitation to take us under her wing and gave us a masterclass in photography for social media. Here are a few key pointers to share…
Lighting
Considering the small size of our office, and the hidden-away nature of it, the natural lighting that comes in can be an issue when it comes to taking photos. Often, we found ourselves struggling with the shadows that fall into the office or the shadows created by additional lighting. A picture would come out looking dark or washed out, with heavy shadow lessening the effect of what could be a good photo. The colouring in the office caused issues too, due mainly to our much-loved bright-green, branded wall, which has a tendency to make an unwanted appearance at the edges of photographs, or in the reflection of our clients’ products.
Our current lightbox had some issues too. Being too flimsy, it would crease terribly, and was too thin to block out the colour of our hype-green wall. With Jacqui’s guidance, we ordered a new, slightly bigger lightbox that came with professional, adjustable LED lighting and infinity backgrounds, which would help us create more lifestyle imagery.

The difference in the quality of our photographs with just this small adjustment is surprising. Our new lightbox is larger, sturdier and better fitted to the job at hand. With blacked-out sides and powerful lighting, there’s no worrying about that green tinge!
Props
A potentially difficult aspect of photography, deciding on props could be hit or miss. Do you go for less is more, or more is more? And how do you know that you’re using the right props? These were all questions that Team hype had asked themselves before.
Often, in photos, we try to use on-brand, on-season props, like these leaves for House of Life.

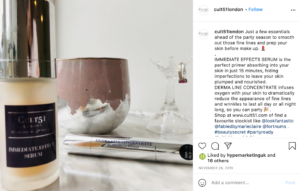
This Cult51 image, for example, which included branded coloured props and Emma’s ring and ring tree.
However, we’d been looking to improve our lifestyle images, and props play a great part in getting the right feel to an image.
Fortunately, Jacqui showed up in the office with a large goody-bag, filled with prop ideas to get us inspired. “Keep it simple” was her primary advice, and good advice at that! She warned us to avoid taking emphasis from the photo’s main focus, and had us look at other images that seemed to do this. “What does your eye go instantly to?” she had us ask ourselves, telling us that if it’s not the product, then something isn’t right.
She also pointed out the issue of empty spacing in images. Gaps between products always look larger when photographed; so, Jacqui recommended setting up props, taking a photo to see how they came out, and then rearranging products for the best effect.
Editing Photos
With Instagram and Facebook filters being so effective these days, it is easy to just stick to these. However, Jacqui took us through more of the settings on our phones to understand these more and take full advantage of them.
There is no need to buy unnecessary editing software. The editing feature on iPhones is very effective, offering many of the things you think you lack on a phone as opposed to a camera. You are able to adjust features like brightness, contrast, and shadows, for example, as well as colour saturation. The filters are also a useful attribute, in particular “vivid”, which really makes products stand out.
It’s funny that just a few small changes can make such a difference. We have already begun to see the improvement in our images thanks to Jacqui’s great advice. With the addition of our new lightbox, a new eye for props and an efficient editing tool to hand, we’re en route to some eye-catching imagery on our clients’ social feeds. It was a true masterclass!